Bzz! Hear that? It’s the sound of you becoming a beekeeper! Did you know that a single bee colony can pollinate up to 300 million flowers a day? That’s right, you’re about to become a superhero for your local ecosystem!
But before you don your cape (or bee suit), let’s get you set up with your very first beehive. Don’t worry if you’re feeling as nervous as a long-tailed cat in a room full of rocking chairs – we’ve got your back.
This guide will walk you through everything you need to know to start your beekeeping adventure. So, grab a cup of tea (sweetened with honey, of course) and let’s get buzzy!
1. Choosing the Perfect Spot: Location, Location, Location!
When I first started beekeeping, I thought I could plop my hives down just about anywhere. Boy, was I wrong! Turns out, bees are pickier about real estate than a millionaire house-hunting in Beverly Hills.

Ideal Sun Exposure And Wind Protection
First up, consider sun exposure. Bees are like tiny, fuzzy solar panels – they need that morning sunshine to get going. But you don’t want them baking all day either. I once had a hive in full sun, and those bees were crankier than a cat in a bathtub. Now I make sure they get some afternoon shade.
Wind protection is crucial too. I learned this the hard way when one of my hives toppled over in a strong gust. I spent hours wrangling thousands of confused bees. Now I ensure my hives are sheltered from strong winds.
Distance From Neighbors And High-Traffic Areas
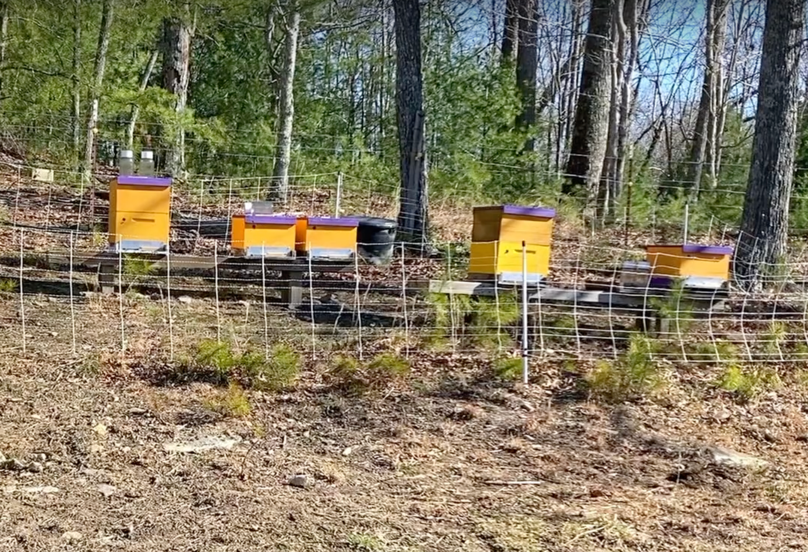
Don’t forget about neighbors! Unless you want to start a neighborhood feud, keep your hives at least 10 feet from property lines. A fence or some shrubs between the hives and neighbors acts like a bee privacy screen.
Think about flight paths too. Bees need a clear runway. I once had a hive facing directly towards a walkway – it was like playing chicken with a squadron of bees. Now I make sure entrances face away from high-traffic areas.
Water Sources Close By
Water source is important. If you don’t provide it, they’ll find it themselves – maybe in your neighbor’s kiddie pool. A simple birdbath near the hives keeps bees happily hydrated.
And don’t forget your own convenience. You’ll visit these hives regularly, so ensure easy access. I once put a hive on a hill for better drainage. Dragging equipment up quickly lost its charm.
Remember, the perfect spot might not be obvious at first. It’s okay to move hives if needed. Just do it at night when bees are home. Finding the right location is about balance – happy bees, unbothered neighbors, and manageable hives. Get that right, and you’re on your way to beekeeping bliss!
2. Gearing Up: Your Beekeeping Shopping Spree!
When I first got into beekeeping, I thought all I needed was a hive and a can-do attitude. Wow, was I wrong! Turns out, beekeeping requires quite a bit of gear.
Types of Beehives and How to Choose
Let’s start with the hive. You’ve got options: Langstroth, Warre, Top Bar, and more. I went with a Langstroth – it’s like a beehive condo, great for beginners and honey production. Just make sure you don’t put the boxes on upside down like I did!
Protective Gear Essentials
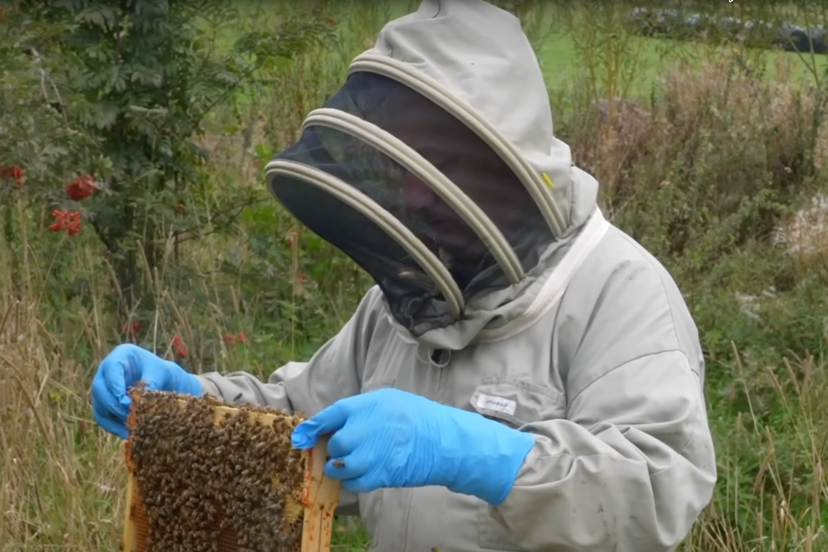
Now, protective gear. Unless you’re aiming to star in a “When Beekeeping Goes Wrong” video, suit up! A good bee suit is your armor. Don’t cheap out – I learned the hard way that a hole in your suit is no laughing matter when you’re elbow-deep in a hive.
Don’t forget proper gloves and a veil. Trust me, gardening gloves and sunglasses don’t cut it. I ended up doing a “bee sting dance” across my yard and looking like I’d gone ten rounds with a boxer.
Basic Tools For Hive Management
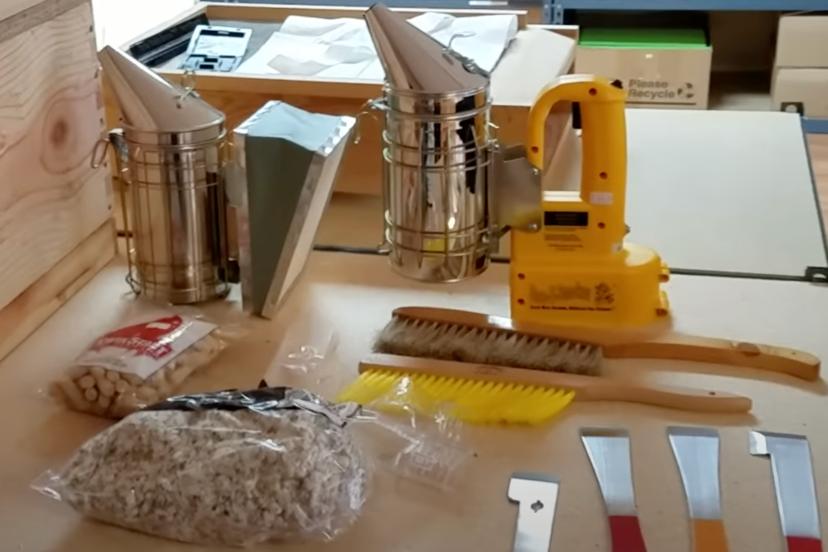
For tools, start with a hive tool. It’s like a Swiss Army knife for beekeepers – prying, scraping, lifting, it does it all.
You’ll need a smoker too. It’s like a tiny fog machine that keeps bees calm. Just don’t overdo it like I did and hotbox the poor bees!
A bee brush is handy for gently moving bees. And get a frame gripper – it’s way better than playing “hot potato” with a frame full of unhappy bees.
Lastly, invest in a good quality feeder. It’s like a bee restaurant for when natural food is scarce. My DIY attempt turned my yard into a sticky bee party.
3. Hive Assembly 101: From Flatpack to Bee Flat
Let me tell you about my first hive assembly. Picture this: me, surrounded by wooden parts, holding a screwdriver like some ancient relic. I felt like I was building IKEA furniture, but with higher stakes!
Step-by-Step Guide to Hive Assembly
Start with the bottom board – it’s the foundation of your bee condo. I was so proud when I got this right. “Look at me, I’m a real beekeeper now!” Little did I know, the dreaded dovetail joints were next.
Those joints on the boxes? Trickier than a Rubik’s cube in oven mitts. Pro tip: a rubber mallet is your best friend. Just don’t get too enthusiastic – I may have put my thumb out of commission for a week.
Painting and Weatherproofing Your Hive
Once assembled, it’s painting time! Choosing a hive color is more stressful than naming your firstborn. I went with calming blue. Turns out, bees don’t care about color theory, but at least it looks pretty.
Don’t forget weatherproofing. I learned this the hard way when my hive became a waterpark after rain. A good coat of bee-safe exterior paint or wood preservative does the trick.
Setting up Frames and Foundation
Now, frames and foundation. You’re basically setting up bee apartments. I felt like a miniature construction worker. “This one’s the living room, this one’s the nursery,” I’d mutter. My husband thought I’d lost it.
Wax foundation is frustratingly delicate. I tore three before getting the hang of it. Keeping them straight in frames is like wallpapering a dollhouse during an earthquake.
Once finished, take a step back and admire your work. You’ve created a palace for bee royalty! I remember feeling a mix of pride and terror. “What have I gotten myself into?” But seeing your first bees move in? Priceless.
4. The Grand Bee Arrival: Rolling Out the Yellow and Black Carpet
The day my first bees arrived, I felt like I was prepping for royalty. Tiny, buzzing royalty!
Ordering Bees: Packages vs. Nucs
First up: ordering bees. You’ve got packages (bee starter kits) or nucs (ready-made mini colonies). I went with a package for the full “new bee parent” experience.
When that buzzing box arrived, I was more nervous than a long-tailed cat in a room full of rocking chairs. Exhilarating and terrifying!
Creating a Sugar Syrup For New Colonies
Before the bees come, you’ve gotta prep their welcome feast – sugar syrup. I felt like a bee chef, but managed to spill half on the floor. Pro tip: cleaning sugar syrup is like mopping glue. My wife wasn’t thrilled about the sticky footprints.
Installing Bees In Their New Home
Installing bees is like pouring angry, flying thumbtacks into a wooden box. Fun, right? I suited up like I was heading into battle. Gloves, check. Veil, check. Courage… that part took work.
Opening that package was intense. The buzz was deafening – a tiny, furry tornado. As I shook the bees in, I kept muttering, “Easy does it, ladies. Please don’t sting me.”
The queen comes in her own cage – bee royalty indeed. Installing her is like placing a pea-sized prima donna in her dressing room while her entourage swarms around.
Once done, I stood back, heart pounding, watching the bees orient to their new home. Magical! Of course, I spent the next week obsessively checking the hive. “Are they happy? Should I have gotten them a welcome mat?”
Looking back, I didn’t need to worry so much. Bees have been at this longer than us. They know what they’re doing. So, stay calm, move slowly, and trust the bees. Oh, and put down newspaper before making syrup. Your kitchen floor will thank you.
5. First Date with Your Bees: The Inaugural Hive Inspection
My first hive inspection? I was more jittery than a cat in a room full of rocking chairs! I’d read every beekeeping book, but nothing prepares you for that first face-to-face with your buzzing tenants.
When To Perform Your First Inspection
Timing is crucial. I waited about a week after installation, though it felt like a month. I suited up like I was preparing for space travel, double-checking every zipper. Trust me, you don’t want a bee exploring your pants leg!
Using Your Smoker And Hive Tool Effectively
Now, the smoker. I’d practiced in my backyard, much to my neighbor’s confusion. “No, Mrs. Johnson, I’m not starting a tiny campfire!” Come inspection time, I puffed that thing like a nervous dragon. Pro tip: a little smoke goes a long way.
Armed with my hive tool, I approached the hive. Heart pounding, I gently pried off the outer cover, half expecting a bee revolution. But no, just a gentle buzz.
What To Look For During Inspections
First check? The queen. Is she laying eggs? I scanned those frames like I was searching for Waldo in a bee costume. Finally spotted those tiny eggs. Victory dance ensued!
Next, checking the brood pattern. Are those baby bees-to-be packed in tight, or scattered like my aunt’s decorating style? Mine looked pretty good.
Don’t forget to check for pests and diseases. I was squinting at those bees like a jeweler examining diamonds. “Is that a mite? Nope, just a speck of dirt. Phew!”
Throughout all this, I’m trying to handle frames gently and not squish any bees. It’s like a very high-stakes game of Operation.
As I closed up the hive, I felt a mix of relief and accomplishment. I’d done it! My bees were alive, the queen was laying, and I hadn’t caused a bee uprising.
Remember: take it slow, use your smoker sparingly, and trust your instincts (and your bees). Oh, and maybe have a celebratory dance prepared. You’re gonna want it when you spot those first eggs!
6. Keeping Your Bees Full and Fabulous: The Feeding Frenzy
When I started beekeeping, I thought bees were totally self-sufficient. Wrong! Sometimes our buzzing buddies need a little TLC, especially with food.
Types Of Feeders And When To Use Them
Feeders come in more varieties than honey flavors! I started with an entrance feeder, accidentally hosting a block party for every insect in the neighborhood. Now, I’m all about top feeders. It’s like running a rooftop restaurant for bees. “Table for 10,000, right this way!”
Supplemental Feeding Guidelines
Timing is crucial. Spring feeding gives bees a boost, like our morning coffee. Fall feeding helps them stock up for winter. But don’t overfeed! I once created a hive of bee couch potatoes who’d rather sip syrup than forage.
Monitoring For Pests And Diseases
Health-wise, I checked my hives more often than a nervous parent with a newborn. Varroa mites? Those vampires are every beekeeper’s nightmare. First time I did a mite check, I was shaking bees into a jar like some bizarre cocktail. “One part bees, two parts panic, shake vigorously.”
Hive beetles are sneakier than a teenager extending curfew. I’ve mastered the “squish and flick” technique – it’s like high-stakes tiddlywinks.
Foulbrood’s another nasty one. First time I smelled it, I thought something had died in my hive. Well, something had – the brood. Not a fun day.
But it’s not all doom and gloom! Regular inspections and good management go a long way. Keep hives clean, well-ventilated, and watch for anything unusual. You’re basically a bee detective.
7. The Bee-Keeper’s Almanac: Year-Round Hive Hustle
Beekeeping’s like a never-ending dance with Mother Nature. Just when you’ve got the rhythm, she throws in a new step!
Spring Management And Growth
Spring’s the season of new beginnings – bee spring break! I channel my inner cheerleader, rooting for the queen to lay eggs. “Go, queen, go!” It’s spring cleaning time, making sure the hive’s spick and span. Prime time for splits too. First time I tried one, I felt like a bee divorce lawyer. “Who gets custody of the queen?”
Summer Honey Flow And Harvesting
Summer’s all about the honey flow. I eye those supers like a kid in a candy store. But patience is key! I once harvested too early and got honey wetter than a rainforest. Now I wait till frames are 80% capped. Harvesting’s where the fun begins. First time with an extractor, I felt like I was in a sticky Mission Impossible. Pro tip: wear old clothes. You’ll smell like a walking flower for days.
Fall Preparation For Winter
Fall’s about prepping for winter – like helping bees pack for a long camping trip. I check food stores and top up if needed. Final mite check too. Nothing ruins a cozy winter cluster like mites. It’s like sending bees to hibernate with bed bugs. Not cool.
Winter Hive Protection And Monitoring
Winter’s the worry season. I check hives more than my phone. Are they warm enough? Enough food? I’ve learned to insulate without suffocating. First winter, I wrapped my hive so much it looked like a mummy. Turns out, bees need to breathe too. Who knew?
Through it all, work with the bees, not against them. They’ve been at this longer than us. I just give a helping hand when needed and stay out of their way otherwise.
8. Dear Bee Diary: Keeping Tabs on Your Tiny Tenants
When I started beekeeping, I thought I could keep all the hive info in my head. Ha! That lasted about as long as a bee’s flight to the neighbor’s flowers. Good record keeping is like a GPS for your beekeeping journey – without it, you’re just buzzing in circles.
Essential Data To Record
What to record? Hive inspections are key. I jot down the date, weather, and observations faster than a bee flaps its wings. Queen spotted? Check. Eggs present? Check. Honey stores? Double check. I once forgot to note a requeening and spent weeks confused about the bees’ new coloring. Talk about a facepalm moment!
Population strength is crucial. I use a 1-5 scale, where 1 is “ghost town” and 5 is “bee Grand Central Station.” It helps track colony progress. Once panicked over a seemingly weak hive, only to check my records and realize it was normal for that time of year. Records: 1, Beekeeper Panic: 0.
Don’t forget treatments and feeding. It’s like a medical record for your bees. You don’t want to accidentally double-dose on mite treatment.
Digital Vs. Physical Record-Keeping Options
For keeping records, you can go old school with pen and paper or digital with apps. I started with a notebook, feeling like a real scientist. Now I’ve gone digital – it’s like having a beekeeping assistant in your pocket.
Using Records To Improve Your Beekeeping Skills
The real magic? Using these records to level up. It’s like having a crystal ball for your hives. I noticed one hive always built up slower in spring. Checked my records, realized it was in a shadier spot. A little relocation later – bam! Buzzing with activity.
Records can help predict when to add supers or prevent swarms. They’re also great for tracking honey production. “Hive 3 is in the lead with 50 pounds!”
So start recording, however you prefer. Your future self (and your bees) will thank you. And who knows? Maybe one day you’ll look back at your first season’s records and have a good laugh. I know I did!
9. Finding Your Hive: Joining the Beekeeping Buzz
When I started beekeeping, I felt like the new kid at school – lost and hoping I wouldn’t make a fool of myself. But joining the beekeeping community was the best move I made. It’s like finding your tribe, except this one’s obsessed with tiny flying insects and isn’t afraid of getting sticky.
Local Beekeeping Associations
Local beekeeping associations are the bee’s knees for support. I walked into my first meeting nervous as a long-tailed cat in a room full of rocking chairs. But once someone started talking about queen-rearing, I was hooked. They speak your language – bee language.
At meetings, you’ll find beginners figuring out which end of a bee is which, and old-timers who can read a hive’s mood by its buzz. It’s a beekeeping buffet of knowledge, and you’ll want seconds.
Online Forums And Resources
Online forums are a 24/7 beekeeping hotline. Got a 2 AM question about why your bees are doing the macarena instead of the waggle dance? Someone’s probably awake and ready to chat. Just remember to take advice with a grain of salt (or a spoonful of honey).
Finding A Mentor
Finding a good mentor is like striking liquid gold. These beekeeping Yodas guide you through sticky situations. Mine had been keeping bees since before I was born and could read a hive like a book. He taught me more in one season than a library of beekeeping books could.
Mentors don’t just answer questions; they ask them too. “Why do you think the bees did that?” became my mentor’s favorite phrase. It taught me to observe and think critically.
Whether you’re joining associations, diving into forums, or seeking mentors, remember: the beekeeping community is as sweet as the honey we love. We’re all in this together, trying to figure out these fascinating creatures.
Don’t be afraid to ask questions and share experiences. We’ve all been there, done that, and got the honey-stained t-shirt. Welcome to the hive, new beekeeper. We’re glad you’re here!
10. Oops, I Did It Again: Learning from the School of Hard Knocks
Oh boy, if mistakes were honey, I’d have enough to fill a swimming pool! But that’s how we learn, right? So, let me save you some sticky situations with a few pearls of wisdom.
Overmanaging The Hive
First up: overmanaging the hive. When I started, I was a helicopter parent to my bees. I’d be in that hive more often than a kid raids the cookie jar. “Is the queen okay? Are they building comb? Did that bee just look at me funny?”
Turns out, bees don’t appreciate helicopter beekeepers. They’re like teenagers – they need space. I learned this when my constant intrusions led to a very cranky hive. Ever tried to outrun angry bees? Not a fun cardio workout, trust me.
Now, I’ve learned to step back. Bees have been at this longer than us. They know what they’re doing. Check regularly, but don’t go overboard. It’s like baking a cake – opening the oven every five minutes won’t make it bake faster.
Neglecting Mite Control
Next: neglecting mite control. When I first heard about Varroa mites, I thought, “How bad could these tiny things be?” Pretty bad, actually. They’re like tiny vampires.
I once decided to “let nature take its course” with mite control. Big mistake. By the time I realized the problem, my hive looked like a tiny apocalypse. Now, I’m religious about mite checks and treatments. It’s like flea control for your pet, but with more buzzing.
Harvesting Too Much Honey
Lastly: harvesting too much honey. First time I harvested, I was like a kid in a candy store. Took frame after frame. Come winter, my poor bees were left with barely enough to survive. I felt like I’d robbed them of their savings.
Now, I always leave plenty for the bees. After all, they’re doing all the work. I think of it as their rent for living in my backyard.
Remember, beekeeping is a journey. We all make mistakes. The key is to learn from them, laugh about them (eventually), and share them with others. Happy beekeeping!
Bee-ing It Home
Congratulations, you’re now armed with all the knowledge you need to set up your first beehive! Remember, beekeeping is a journey, not a destination.
There will be sweet successes and sticky challenges along the way, but that’s all part of the fun. As you embark on this amazing adventure, keep in mind that every experienced beekeeper was once a beginner just like you.
So don’t be afraid to make mistakes – that’s how you’ll learn and grow. Before you know it, you’ll be the bee’s knees of beekeeping in your neighborhood! Now go forth, set up that hive, and let the adventures begin. Welcome to beekeeping, where your new best friends have six legs and a stinger!


