Bzz! Did you hear that? It’s the sweet sound of success in beekeeping! Whether you’re drawn to the golden nectar or fascinated by these industrious insects, starting your beekeeping journey is an exciting adventure. But before you dive in, you’ll need the right tools.
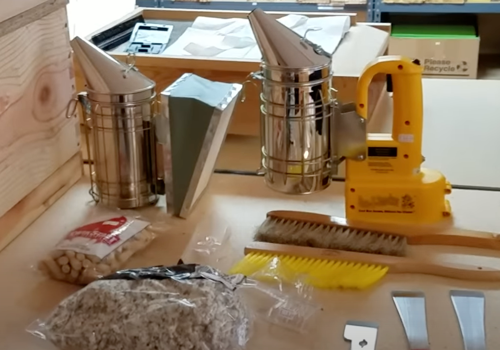
Did you know that a well-equipped beekeeper can manage a hive in just 15-30 minutes per week? That’s right! With the proper gear, you’ll be a honey harvesting hero in no time.
Let’s explore the 10 essential tools every novice beekeeper needs to get started on the right foot in 2024.
- 1. Protective Gear: Your First Line of Defense
- 2. Hive Tool: The Beekeeper's Swiss Army Knife
- 3. Smoker: Keeping the Bees Calm and Collected
- 4. Bee Brush: Gentle Bee Relocation
- 5. Frame Gripper: Easy Frame Handling
- 6. Uncapping Fork or Knife: Honey Harvest Helpers
- 7. Honey Extractor: From Comb to Bottle
- 8. Feeders: Supporting Your Hive's Health
- 9. Queen Catcher: Handle with Care
- 10. Record Keeping Tools: Track Your Beekeeping Journey
- The Final Buzz
1. Protective Gear: Your First Line of Defense
I’ll never forget the day I learned the hard way about beekeeping gear. Picture this: me, a newbie beekeeper, thinking I’m a bee whisperer and tough enough to handle a few stings. Fast forward to me looking like I’d lost a fight with a swarm of angry baseballs. Lesson learned: good protective gear isn’t optional, it’s essential.
Beekeeper Suit or Jacket with Veil
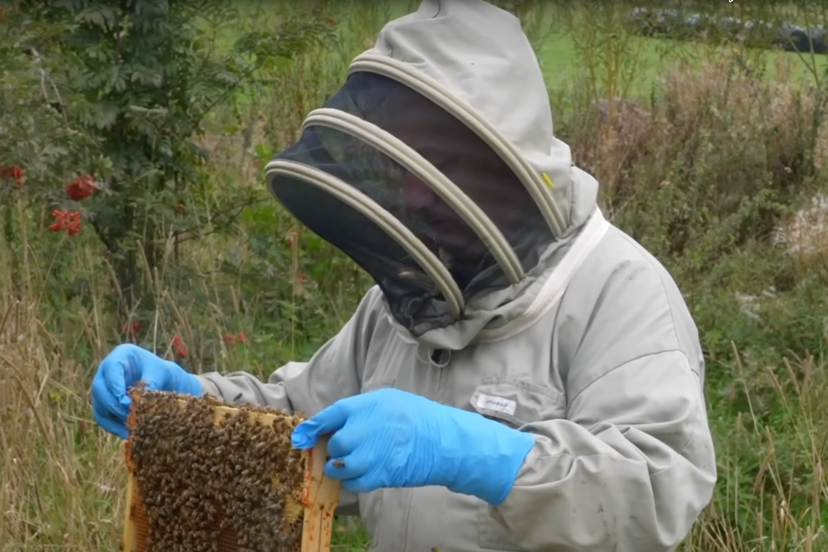
Let’s start with the beekeeper suit or jacket with veil. This is your armor against the buzzing army. Make sure you go with a white or light colored suit that’s a little baggy. You want to be able to move comfortably as you’ll be squatting and bending down.
A dark suit will get too hot and bees will attack you thinking you’re a bear or raccoon. White gear isn’t a style choice for beekeepers, it’s for protection. Cotton and nylon are the most popular suit materials and you can get suits with ventilation mesh as you will get quite hot in your suit in the middle of summer.
You also want a snug veil – unless you want bees playing tag on your face. And don’t make this common rookie mistake of not zipping up all your zippers properly! That’s a mistake you’ll hopefully only make once. Take your time suiting up as you get started. No need to rush out to your hive.
Gloves Designed for Beekeeping
Now, gloves. And I’m not talking about your garden variety here. You need thicker, elbow-length beekeeping gloves or ones long enough to tuck your suit into. Trust me, your average work gloves are about as useful as tissue paper against bee stingers. Goatskin are thinner than your traditional leather but still protect from stings. That’s my recommended choice.
Many experienced beekeepers switch to nitrile gloves as they’re thin and flexible or lose the gloves altogether as it’s so much easier to get things done without them on but as a beginner you definitely need good beekeeper gloves.
Proper Footwear for Apiary Work
Don’t forget about footwear! Bees don’t discriminate – they’ll sting your toes and ankles just as happily as any other body part. You don’t want to be caught around some annoyed bees in your sandals. Ouch! Go for sturdy boots or high-top sneakers that cover your ankles. And avoid black socks – again dark colors are predators.
Wear long socks that again you can tuck your suit into. Bees crawl up so protecting your feet and any access into your suit is an important line of defense!
Remember, even with all this gear, you’re not invincible. I’ve had bees sneak into my suit more times than I can count. It’s like they see it as a personal challenge. Always stay alert, move slowly, and respect the bees.
Beekeeping is a mix of science, art, and occasionally looking like a marshmallow in your protective gear. But with the right equipment, at least your “learning experiences” won’t leave you covered in stings. Stay safe out there, fellow beekeepers!
2. Hive Tool: The Beekeeper’s Swiss Army Knife
When I first started beekeeping, I had no clue how essential a hive tool would become. Now, I wouldn’t dream of approaching my hives without it. This little gadget is the unsung hero of the apiary world.
Uses for Prying, Scraping, and Lifting
Let’s talk uses. Prying, scraping, lifting – this tool does it all. I once tried separating hive boxes without one. Big mistake. It was like trying to open a pickle jar with buttered hands. But with a hive tool? It’s a breeze. Just slide it in, give a little twist, and you’re golden.
And scraping? Don’t get me started. Bees are like tiny, flying construction workers, always building where they shouldn’t. My hive tool has saved my bacon countless times when dealing with excess comb or propolis.
Different Types of Hive Tools Available
Now, not all hive tools are created equal. You’ve got your basic flat bar, great for beginners. Then there’s the J-hook style, a game-changer for frame lifting. I swear by my multi-tool version – it even has a bottle opener. Perfect for that post-hive-check beer!
Importance of Keeping It Clean
But here’s the kicker – keeping it clean is crucial. I learned this the hard way when I accidentally spread chalkbrood between hives. Now, I’m religious about cleaning between uses. A little rubbing alcohol or flame sterilization does the trick. Some people like to use bleach and others have multiple hive tools for specific hives or locations.
I’ve even got a holster for mine now. Makes me feel like a beekeeper cowgirl, ready to draw at the first sign of trouble. Just remember to check your back pocket before sitting down! A Bee Belt isn’t a necessity but it’s definitely handy.
Bottom line: a good hive tool is worth its weight in honey. It’s not just a tool, it’s your sidekick in the beekeeping adventure. You’ll never do a hive inspection without one. So treat it well, keep it clean, and for Pete’s sake, don’t forget it at home. Your bees (and your sanity) will thank you!
3. Smoker: Keeping the Bees Calm and Collected
When I first started beekeeping, I thought I could charm my way through any situation. Ha! It wasn’t until I got my hands on a smoker that I realized what a game-changer it could be. It’s like a magic wand for us beekeepers.
How a smoker works to pacify bees
So how does this gadget work its magic? Well, when you puff smoke into the hive, it triggers the bees’ instinct to prepare for a potential forest fire. They start gorging on honey for survival, thinking they might need to flee. A bee with a full belly is about as aggressive as a sloth on vacation, just think of how you feel after indulging in Thanksgiving dinner.
Proper Fuels for Smokers
Now, let’s talk fuel. I made some rookie mistakes here. I once tried using old newspaper and nearly set my apiary ablaze. Not my finest moment. Natural materials like pine needles, dried leaves, twigs, as well as burlap or natural cotton work best. They produce a cool, clean smoke that won’t tick off the bees and burns longer.
The benefit to natural materials is you can find them around you for free but many people prefer to have a bag of 100% cotton strips, smoker pellets, or a roll of unbleached twine on hand or in their Bee Belt. These are available in many stores or online.
You can also add dried herbs to your smoker, like lavender, basil, mint, oregano, sage, rosemary, eucalyptus and citrus peels. Adds a sweet scent to your smoke instead of leaving a barbeque aroma. If you have grapefruit leaves or creosote bushes where you live – even better! There’s evidence that using them in your smoker reduces varroa mites.
Techniques For Effective Smoker Use
But here’s the kicker – it’s not just about having a smoker, it’s about using it right. I learned this the hard way when I practically hotboxed my poor bees. The key is gentle puffs, not billowing clouds. You want to calm them, not make them think they’re in the middle of an inferno. One to three puffs should be enough.
Pro tip: keep that smoker lit! There’s nothing worse than realizing mid-inspection that your smoker’s gone out. Trust me, I’ve done the “avoid-the-angry-bees” dance more times than I care to admit.
Remember, where there’s smoke, there’s calm bees. Just don’t overdo it – you want them mellow, not comatose or singed.
4. Bee Brush: Gentle Bee Relocation
I will never forget the day I learned about bee brushes! There I was, shooing bees with my bare hands like some wannabe bee whisperer. Spoiler alert: it didn’t end well. After a impromptu “sting dance,” I realized there had to be a better way.
Soft-Bristled Brushes For Bee Safety
Enter the bee brush – a total game changer. Here’s the deal: you want soft bristles. I prefer natural horsehair brushes over synthetic. Trust me, I once used an old paintbrush from the garage. Those stiff bristles? Might as well have been tiny pitchforks to my bees.
When and How to Use a Bee Brush
So when do you use this magic wand? It’s perfect for clearing bees off frames and other parts of your hive during inspections or honey harvests. It’s another tool you want to always have with you during inspections. Gentle sweeps from top to bottom, and voila! Clear frames.
But here’s the kicker – you have to use it right. Slow, gentle strokes are key to prevent injury to your bees, while keeping them calm and you want to just move a couple at a time. Slow movements keep your bees safe! No sweeping involved here.
You can also turn your frames upside down so bees drop off before you brush, saving you work and fewer losses or injuries to your bees. To move a larger amount of bees at a time and more quickly, a smoker would be a better option.
Alternatives to Bee Brushes
Now, sometimes a brush just won’t cut it. I’ve used everything from turkey or rooster feathers to grass in a pinch.
One of my go-to alternatives is the shake method. Give the frame a sharp shake over the open hive. It’s effective, and then you’re left with just the stragglers to brush off. Although this is more challenging for a beginner beekeeper and comes with experience. In the beginning you might just end up irritating your hive, making your inspection more difficult.
Next time you’re faced with a frame full of bees, reach for that soft-bristled brush. Your bees (and your fingers) will thank you!
5. Frame Gripper: Easy Frame Handling
Let me tell ya, when I first started beekeeping, I thought I could just yank frames out with my bare hands. Big mistake! I’ll never forget the day I ended up covered in honey, with a bunch of angry bees giving me the what-for. That’s when I discovered the magic of the frame gripper.
Benefits of Using a Frame Gripper
This nifty tool is like having a third hand, but one that’s actually useful around bees. It grabs the frame ends, giving you a solid grip without squishing any of your buzzing buddies or dropping any of your frames and a free hand to carry on with your inspection. First time I used one, it was smooth as butter!
Proper Technique for Frame Removal
Now, there’s a knack to using it right. Grip firmly, but not so tight you’re crushing the wood. The trick is to slide the gripper down, get a good hold, then gently rock the frame to break the propolis seal. It’s like a little bee dance – rock, rock, lift. I’ve gotten pretty good at it over the years, but it can take a little practice. So stay calm and take your time figuring it out.
You’ll definitely want a well-made frame grip and one that is designed for the specific type of hives that you have.
Maintaining Your Frame Gripper
But here’s something they don’t tell you in beekeeping 101 – frame grippers get gunked up fast. All that propolis and wax builds up, and before you know it, your smooth operator is stickier than a toddler with a lollipop.
Proper maintenance is crucial. Once let mine get so sticky, it glued itself to a frame. Now, I clean mine after every use. Wipe it clean, maybe a little scrape, some warm water, or a wipe with rubbing alcohol, and it’s good as new.
6. Uncapping Fork or Knife: Honey Harvest Helpers
Let me tell you about my first attempt at uncapping honeycomb. There I was, armed with grandma’s old kitchen knife, thinking I’d be the Michelangelo of honey extraction. Spoiler alert: I wasn’t. I ended up with a mangled mess of wax and honey that looked more like modern art than beekeeping.
Different Types of Uncapping Tools
Now, you’ve got options for uncapping. There’s the classic cold uncapping knife – think of it as a honey harvester’s sword. Then you’ve got an uncapping roller, plane, or the uncapping fork, like a tiny pitchfork for your hive. Some people swear by electric knives, but where’s the elbow grease in that? And there are also steam knives.
There are benefits and drawbacks to each option. If you’re on a budget and starting out with only a handful of hives, then a regular uncapping knife is going to be just fine.
Technique for Uncapping Honeycomb
Uncapping honey is so satisfying! The technique you’re going to use will vary slightly depending on the type of knife you have. No matter what you want to go slowly with gentle, smooth strokes, starting from the top of your frame down. Some beekeepers prefer to go bottom up – just be careful with your vertical pressure.
You’re going to cut or melt the wax, in order to uncap your honey. You gotta have a steady hand and a gentle touch. Hold the frame at a slight angle and let the knife do the work. You’re just shaving off the outer layer. If using heat – you don’t want to burn your honey.
Miss a few spots? That’s where the uncapping fork comes in handy. They key is to maximize your honey yield while minimizing the mess, waste, and clean up.
Don’t drop those cappings on the ground! You’ll want to let honey drip out of them into your uncapping tank, again minimizing waste, and then save the cappings for candles, soaps, balms, and beeswax blocks.
Cleaning and Maintaining Uncapping Tools
Now, let’s talk cleanup. Cleaning is crucial as uncapping is a sticky job! When you’re not using your hot knife, you want to wipe your blade clean or place it in a pan with warm water. This will prevent honey from caramelizing or burning on your knife. It’s best to keep damp towels or cloths around before you even start.
After each use, clean your uncapping knife or tools to prevent bacterial growth and buildup of honey. Do this by rinsing your blade, wiping it with a damp cloth, a soak and scrub if necessary for stubborn stickiness, and wash with dish soap or stronger disinfectants.
Fully dry your tool before putting it away. You don’t want to find rust on your knife the next time you pull it out.
Make sure to keep your sticky equipment away from your bees. I’m talking at least 25 feet. You don’t need to get your bees all excited with free honey snacks.
Remember, find the tool that works best for you. Your first few frames might look rough, but soon you’ll be uncapping like a pro. If you can keep the combs in good condition, your bees will repair any damage and reuse them.
7. Honey Extractor: From Comb to Bottle
Let me tell you about my first honey extraction attempt. There I was, squeezing frames like some giant, sticky stress ball. Needless to say, it didn’t go well. My kitchen looked like a honey bomb had gone off! That’s when I realized I needed a proper extractor.
Types of Honey Extractors for Beginners
For you newbies, an extractor is basically a big centrifuge for your frames. Pop ’em in, give it a spin, and out comes that liquid gold. I started with a manual two-frame model. Talk about a workout! Felt like I was training for the beekeeping Olympics.
Now you can extract honey manually, using the crush-and-strain method with a tool or your hands. It’s a lot cheaper and you don’t have to spend time cleaning an extractor, but it is more labor-intensive and time consuming. An extractor is also better for the bees as they can reuse the combs, saving them time and energy too.
Manual vs. Electric Extractors
Manual extractors are great for beginners. They’re cheaper and you really get a feel for the process. Plus, you’ll impress friends with your newly developed hand crank arm muscles!
As my apiary grew, I upgraded to an electric model. It was like going from a bicycle to a Ferrari. Just flip a switch and honey flows like a golden river. There are a few different kinds of extractors to choose between, radial (4+ frames) or tangential (2-4 frames).
If you have a lot of honey to extract, consider going the electric route.
Proper Use and Cleaning of Extractors
Start slow, especially with manual extractors. Gentle spins to start, then gradually increase speed. And don’t forget to flip those frames if you’re using a tangential type!
After extraction, my extractor looked like it’d been through a honey apocalypse. Cleaning is crucial to prevent bacterial growth, ruining the taste of your honey, avoiding attracting pests, and for the long-term use of your extractor.
If you’re a glutton for punishment, you can use a silicone spatula to scrape out honey. Or you can heat up your room and tilt your extractor to drain the hot honey out before you rinse rinse rinse. I don’t like to use boiling hot water as it melts the wax and makes a bigger mess.
Then you want to clean, sanitize, rinse again, and make sure its very dry.
Whether you’re team manual or team electric, a clean, well-maintained extractor is key to quality honey. Even if things get messy, remember – you’re covered in honey, and there are worse things in life! Happy extracting, guys!
8. Feeders: Supporting Your Hive’s Health
Honey bee feeders are an essential part of your beekeeper’s equipment, as they help keep your colonies alive. Bees are mostly self-sufficient but there are certain times, like when establishing a new colony, when you have extreme hot or cold weather (over winter depending where you live), after extracting honey in the fall, or if resources are lacking in your area.
Types of Feeders (Entrance, Frame, Top)
There are more types of feeders than flavors at an ice cream shop. Entrance feeders, frame feeders, baggie feeders, top feeders, pro feeders, division board feeders, free feeders – it’s enough to make your head spin! And lots of debate on which is best.
Baggie feeders and top feeders are my favorite. Top feeders are known as the most durable, efficient, and can hold enough syrup to get your bees through the winter. Just don’t buy the cheap ones as you risk drowning your bees, many are designed to prevent this.
Baggie feeders are lightweight and take up minimal space, nothing more than a 3 inch super. The heat from your bees keeps them from freezing and there is minimal bee death from drowning. One of the safest options for your bees. And there’s space for pollen patties or sugar cakes in winter.
Things for you to consider are your budget, size of the feeder for the size of your colony, use, weather conditions, what you plan to feed the bees (syrup, disease-free native honey, fondant, dry sugar, homemade sugar water) etc.
9. Queen Catcher: Handle with Care
I was so nervous the first time I had to mark a queen bee. I was inexperienced with my queen catcher and didn’t want to hurt her or alarm the colony. Don’t worry after a little practice (try on some drones first) it gets really easy!
Importance of Queen Identification
Identifying the queen is like finding Waldo in a sea of striped shirts. She’s usually bigger, with a longer abdomen, but when you’re new, every bee looks like royalty. It’s not necessary to mark her but there are benefits.
It really makes her easier to find, saving you a ton of time. This means you don’t disturb your colony as much, helps in the event of a swarm, and helps monitor if your queen has been overthrown.
How to Use a Queen Catcher Safely
Enter the queen catcher – it’s like a tiny bee elevator. First time I used one, I felt like a secret agent. “The queen is secure, I repeat, the queen is secure!” Okay sometimes I still say this.
Like I said, practice on some drones first til you get the hang of it. It’s all about patience and a gentle touch. Spot the queen first, then gently place the catcher over her. One handed models are my favorite. Simply squeeze the handle, put the catcher over the queen and close.
You’ll get some surrounding workers, but they can easily fly through the slots and the bottom is cut away so you won’t injure anyone’s legs.
If you’re new, only attempt when you can easily replace your queen, in the spring and early summer. This is not something you want to do going into the cold season!
10. Record Keeping Tools: Track Your Beekeeping Journey
When I first started beekeeping, I was pretty sloppy and inconsistent with my record keeping and later regretted not writing things down, because of course I forgot even though at the time I swore I’d just remember it all.
Importance of Hive Inspection Records
That’s when I learned the importance of keeping good records. It’s like having a diary for your bees. It really allows you to assess your colony’s health, behaviour, and production. It helps you choose between colonies (say for queen rearing), with swarm control, keep track of signs of disease or pests, etc.
The larger your apiary grows, the more crucial proper data collection becomes.
You’ve got two main options: old school pen and paper, or digital tools. I started with a trusty notebook, feeling like a real scientist. But deciphering my chicken scratch after a long day was like reading ancient hieroglyphics.
Digital vs. Physical Record-Keeping Options
These days, I’ve gone digital. There are great apps out there – like having a little beekeeping assistant in your pocket. Plus, no risk of honey-soaked records!
Key Data Points to Track for Each Hive
Whatever your style, consistency is key. Track the queen situation, brood pattern, honey stores, and population strength for each hive. It’s like a bee Facebook profile – you want all the vital stats.
Don’t forget to note treatments and feeding. It’s like keeping a medical record for your bees. You don’t want to accidentally overdose them on mite treatment!
I also jot down unusual observations. Once, I noticed a peculiar smell in a hive. Weeks later, dealing with European Foulbrood, I wished I’d paid more attention to that early warning sign.
Good record keeping isn’t just about being organized. It’s about being a better beekeeper. It helps you spot patterns, prevent problems, and understand what’s going on in your hives.
So grab a notebook, download an app, heck, chisel it into stone tablets if that’s your thing. Just keep those records. Your future self (and your bees) will thank you!
The Final Buzz
Armed with these 10 essential tools, you’re ready to embark on your beekeeping adventure! Remember, beekeeping is as much an art as it is a science. As you grow more comfortable with these tools, you’ll develop your own techniques and preferences. Don’t be afraid to ask experienced beekeepers for advice – the beekeeping community is known for its helpfulness and camaraderie.
So, suit up, light that smoker, and get ready to experience the fascinating world of bees firsthand. Who knows? With dedication and the right tools, you might just become the next beekeeping sensation in your neighborhood. Happy beekeeping!!

